
Contents
- What is a press brake back gauge?
- How does a press brake back gauge work?
- Main components of a CNC back gauge
- Types of press brake back gauges
- What does each back gauge axis control?
- Back gauge accuracy and positioning tolerance
- Back gauge calibration: when and how
- Common problems and troubleshooting
- Back gauge maintenance checklist
- Where the back gauge matters
- Frequently asked questions about the back gauge
The back gauge is the most underestimated component on a press brake, and the one that most directly determines consistency across a batch. It takes no part in forming, yet it decides where every bend line lands on the sheet. This guide works through the same questions in order, from construction, types and axis configuration to accuracy, calibration, troubleshooting and maintenance intervals.
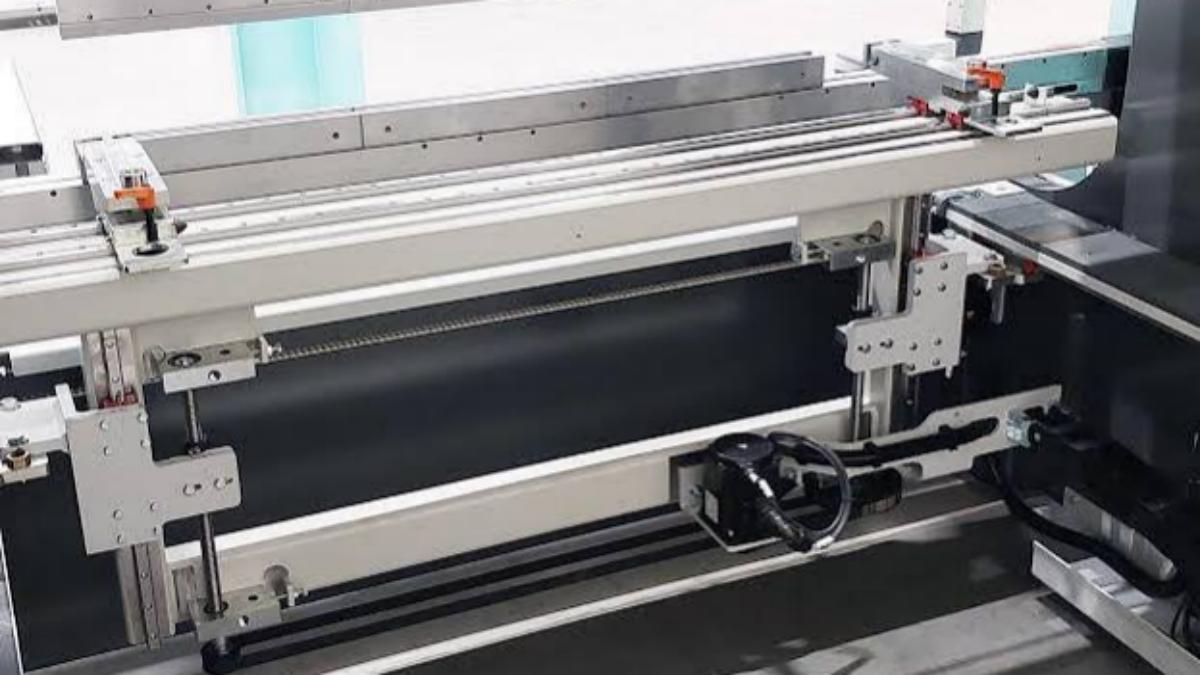
1. What is a press brake back gauge?
A press brake back gauge (also written as "backgauge") is a mechanical or servo-driven positioning device mounted at the rear of a press brake. Its job is to establish a fixed reference point against which an operator, or a robotic loader, pushes a sheet of metal, so that the bend line lands in exactly the right place relative to the sheet edge.
The back gauge sits behind the die area, running parallel to the lower die, the V-die. It consists of a beam that travels forward and backward, toward and away from the operator, with one or more stop fingers mounted on that beam that make physical contact with the sheet.
It automates what used to be a manual tape-measure-and-mark process. The operator, or the machine's CNC controller on automated cells, sets a target dimension; the gauge beam moves to that position; the sheet is slid back until it touches the fingers; the ram fires. Every bend after the first uses the same reference, which is what makes repeat parts consistent.
Without an accurate back gauge, bend-line placement depends entirely on operator skill and manual measurement: a slow, error-prone approach that does not scale in production. A properly calibrated back gauge is what allows a shop to hold tolerances of ±0.1 mm or better across a batch of hundreds of parts, and it is often the deciding factor when evaluating an entry-level CNC press brake against a full servo-electric model.
2. How does a press brake back gauge work?
The back gauge runs a closed-loop positioning cycle that repeats for every bend in a part program. Understanding that cycle clarifies why axis count and servo quality matter so much for cycle time and accuracy.
The cycle can be summarised as position, contact, bend, retract, reposition, repeat.
- The CNC positions the gauge. The controller reads the target dimension from the bend program and drives the gauge beam, via ball screw and servo motor, to the exact X-axis distance from the die centreline.
- The sheet contacts the fingers. The operator, or a robotic arm, slides the sheet metal blank backward until its edge makes contact with the stop fingers mounted on the gauge beam.
- The ram bends. Once contact is confirmed, visually by the operator or via a sensor on automated cells, the ram descends and forms the bend at the pre-set angle and depth.
- The gauge retracts. After the bend, the back gauge either holds position, for a repeat bend at the same dimension, or retracts and repositions for the next step, which is especially important on box and pan parts where the gauge must move out of the way to avoid collision with an already-bent flange.
- Next bend. The cycle repeats, with the controller automatically indexing to the next programmed dimension until the part is complete.
3. Main components of a CNC back gauge
A CNC back gauge is a precision assembly of mechanical and electronic parts working together. Understanding each component helps operators diagnose faults faster and makes purchasing decisions more informed.
3.1 Back gauge beam
The rigid structural bar that spans the width of the machine and carries the stop fingers. Beam rigidity directly affects positioning accuracy, and on wide-bed machines deflection can introduce error.
3.2 Stop fingers
The contact points that physically touch the sheet edge. Fingers are typically adjustable in height and lateral position, and many CNC systems allow independent finger control for tapered or asymmetric parts.
3.3 Ball screws
Convert the rotary motion of the servo motor into precise linear travel of the gauge beam. Ball screw quality, including grade, preload and lubrication, is one of the largest contributors to long-term positioning accuracy.
3.4 Linear guides
Rails and bearing blocks that keep the beam moving in a true, wobble-free straight line. Worn or contaminated linear guides are a common source of repeatability drift.
3.5 Servo motors
Drive the ball screws with closed-loop feedback, allowing the controller to command exact positions and velocities rather than relying on open-loop timing.
3.6 Encoder
Mounted on the servo motor, or sometimes directly on the ball screw or linear scale, the encoder reports actual position back to the controller in real time. The closed-loop correction that makes CNC positioning accurate depends on it.
3.7 Controller
The CNC or NC unit that stores bend programs, calculates required gauge positions and commands the servo motors. Controller software also manages collision-avoidance logic between the R-axis and the sheet during multi-bend sequences.
4. Types of press brake back gauges
Back gauges range from simple manual stops to fully automated multi-axis servo systems. Choosing the right type depends on production volume, part complexity and budget.
4.1 Manual back gauge
Low cost, simple mechanics, minimal maintenance and no electronics to fail.
- Against that, repositioning is slow, accuracy depends on the operator, and it cannot run programmed multi-bend sequences.
- Used on low-volume shops, one-off prototyping, simple single-bend parts and educational machines.
4.2 NC back gauge
Faster than manual, with a digital position display and better repeatability.
- Many models still need manual input between steps, and automation is limited compared with full CNC.
- Used on small-to-mid volume shops running moderately repetitive parts.
4.3 CNC back gauge
High repeatability, fast changeover between part programs, support for complex multi-bend and multi-axis sequences, and integration with offline programming software.
- Against that, a higher upfront cost and a need for trained operators or programmers.
- Used on production fabrication shops, contract manufacturers and shops running frequent job changes.
4.4 Servo back gauge
Many manufacturers market a distinct servo back gauge tier: a CNC back gauge where every axis, X, R and any additional Z, X1-X2 or R1-R2, is driven by an independent AC servo motor with full closed-loop feedback rather than a mix of servo and pneumatic or manual axes.
- The advantages are the highest achievable positioning accuracy and repeatability, and independent axis control that enables tapered and asymmetric parts without manual intervention.
- The disadvantages are premium pricing and more axes to maintain and calibrate.
- Used for precision fabrication, aerospace and automotive components, and shops needing tight tolerance control across varied part geometries.
5. What does each back gauge axis control?
Axis configuration is the most important spec when comparing back gauges, because it determines which part geometries can be produced without manual intervention. The count itself is not a measure of accuracy: what matters is translating it into the parts you actually need to make.
| Configuration | Axes included | Best for | Relative cost |
|---|---|---|---|
| 2-axis | X, R | Simple straight-flange parts, low-to-mid volume | Lowest |
| 4-axis | X, R, Z1, Z2 | General fabrication with mixed sheet widths | Moderate |
| 6-axis | X1, X2, R1, R2, Z1, Z2 | Tapered parts, asymmetric geometry, aerospace and precision work | Highest |
5.1 X axis: the basis of flange length
Controls the front-to-back travel of the entire gauge beam, setting the distance from the die centreline to the stop fingers. This is the primary dimension that determines flange length. Every back gauge, from manual to six-axis, has an X axis, and it is the foundation of all bend-length positioning.
5.2 R axis: clearing the fingers from formed flanges
Raises and lowers the stop fingers vertically. On multi-bend parts, a previously formed flange can physically collide with the fingers if they stay at a fixed height. By dropping the fingers, or the beam height, between bends, the R axis lets the sheet clear the gauge as it repositions, which is essential for box, pan and enclosure parts with multiple flanges on the same edge.
5.3 Z1 / Z2 axes: independent lateral finger movement
Allow the two gauge fingers to move independently left and right along the beam. This lets operators support sheets of different widths or asymmetric parts without repositioning fingers by hand, as the controller drives each finger to its programmed lateral position automatically.
5.4 X1 / X2 axes: tapered and trapezoidal parts
Give each finger independent front-to-back X travel. This is what makes tapered or trapezoidal parts possible, because the left finger can sit at a different depth than the right one, matching a non-parallel sheet edge in a single motion.
5.5 R1 / R2 axes: independent height on each side
Give each finger independent vertical control. This supports parts where one side of the sheet needs a different finger height than the other, for example stepped or offset flange geometries.
6. Back gauge accuracy and positioning tolerance
Back gauge specifications translate into part quality through several distinct, and often confused, metrics.
- Typical positioning accuracy: most industrial CNC back gauges achieve ±0.02 mm to ±0.05 mm positioning accuracy per axis under standard conditions, though this varies with ball screw grade and beam length.
- Repeatability: measures how consistently the gauge returns to the same commanded position across many cycles. It is typically tighter than absolute accuracy, often ±0.01 mm to ±0.03 mm on well-maintained servo systems.
- Servo accuracy: determined by encoder resolution, in pulses per revolution, combined with ball screw lead. Higher-resolution encoders allow finer position increments and tighter closed-loop correction.
- Backlash: mechanical play in the ball screw nut or gear coupling that causes a small position error when the gauge changes direction of travel. Backlash compensation is typically programmed into the controller, but it degrades as components wear.
- Thermal expansion: extended production runs generate heat in servo motors and ball screws, causing minute dimensional changes in the beam and screw length. The effect matters most on precision work with tolerances under ±0.05 mm.
| Factor | Description |
|---|---|
| Beam rigidity | Deflection on a wide bed becomes position error directly, so a long beam needs a stiffer section |
| Ball screw preload | Insufficient preload allows play under load, so positioning drifts on the return stroke |
| Linear guide condition | Contaminated or worn guides let the beam run off line and destroy parallelism |
| Ambient temperature stability | Shop temperature swings change metal dimensions directly, and long beams are more sensitive |
| Finger contact surface wear | Worn or loose finger contact faces shift the real contact point away from the set dimension |
| Controller backlash compensation | The compensation values need adjusting as wear progresses, and they drift if calibration is skipped |
7. Back gauge calibration: when and how
Calibration restores the back gauge to its designed accuracy after wear, collision or extended use has introduced positioning drift. Skipping it is one of the most common and most avoidable causes of scrap in bending operations.
Calibrate after any detected dimensional drift, following a finger collision or crash, after replacing a ball screw or servo motor, or on a fixed preventive schedule. The tools needed are a certified precision measuring instrument with traceable calibration, such as a dial indicator or digital caliper, a straightedge, a test sheet of known thickness and material, and access to the machine's calibration or service menu.
On safety, lock out the machine's ram before any manual measurement near the die area. Never reach into the bending zone while the machine is powered and in cycle-ready mode. Follow your facility's lockout and tagout procedure for any adjustment requiring hand access near the gauge beam or fingers.
7.1 Step 1: Clean
Remove all dust, metal shavings and oil residue from the gauge beam, linear guides and finger contact surfaces. Debris on the guide rails is a frequent and easily overlooked cause of inconsistent readings.
7.2 Step 2: Measure
Using the dial indicator or caliper, measure the actual gauge position at several points across its travel range and compare against the CNC controller's displayed position to quantify any offset.
7.3 Step 3: Parallelism
Check that the gauge beam runs parallel to the die centreline across its full width using a straightedge or dial indicator sweep. A beam out of parallel introduces a taper error even if the X-axis positioning reads correctly.
7.4 Step 4: Finger adjustment
Adjust or replace worn stop fingers so their contact faces are square and at a consistent height, then re-tighten the mounting bolts to the manufacturer-specified torque.
7.5 Step 5: Test bend
Run a test bend on scrap material of the same gauge and material as production, measure the resulting flange dimension and compare it against the programmed target. Adjust the controller offset until the measured result matches the commanded dimension within tolerance.
8. Common problems and troubleshooting
The table below maps the common symptom to its likely cause and the action that resolves it. In most cases the fault can be cleared without opening the machine, by checking the alarm log, the state of fasteners and lubrication, and the controller offset values.
| Problem | Likely cause | Solution |
|---|---|---|
| Back gauge not moving | Servo drive fault, loose coupling, or E-stop engaged | Check the E-stop status, inspect servo drive alarms and verify the motor coupling is secure. |
| Wrong position | Incorrect controller offset or uncalibrated axis | Re-verify the controller offset against the measured position and recalibrate the axis. |
| Finger collision | R-axis not programmed to retract between bends | Update the bend program to include an R-axis retraction step and check the collision-avoidance settings. |
| Servo alarm | Overload, overheating or encoder feedback fault | Check the servo drive alarm code, inspect motor load and cooling and verify the encoder cable connection. |
| Encoder fault | Damaged encoder, loose cable or contamination | Inspect and reseat the encoder cable, clean the encoder housing and replace the encoder if the signal remains unstable. |
| Ball screw wear | Insufficient lubrication or extended service life | Inspect for play or looseness, relubricate according to the maintenance schedule and replace the ball screw if the backlash is excessive. |
| Backlash | Worn ball screw nut or loose coupling | Apply the controller backlash compensation and replace the worn ball screw nut or coupling if necessary. |
| Repeatability error | Contaminated linear guides, worn fingers or thermal drift | Clean and relubricate the linear guides, replace worn fingers and allow a machine warm-up cycle before precision production. |
| Noise | Dry ball screw, worn bearing or loose mounting hardware | Lubricate the ball screw, inspect the bearings and tighten all beam and motor mounting bolts. |
| Slow movement | Servo drive parameter fault, mechanical binding or overload | Check the servo drive speed and torque parameters, inspect the guides for binding and reduce the load if it is overloaded. |
9. Back gauge maintenance checklist
Consistent maintenance is the most cost-effective way to preserve back gauge accuracy and avoid unplanned downtime. The checklist below is organised by frequency.
| Frequency | Maintenance task |
|---|---|
| Daily | Wipe the back gauge beam and fingers, perform a visual inspection and check for smooth full-travel movement. |
| Weekly | Check lubrication levels, inspect finger wear or looseness and verify the reference dimension against the controller display. |
| Monthly | Perform a full measured calibration check covering steps 2 to 5, inspect servo mounting and cables and check for backlash with a dial indicator. |
| Every 6 months | Verify full parallelism, check ball screw preload, perform encoder diagnostics through the controller and replace worn guide wipers or seals as necessary. |
10. Where the back gauge matters
Applications of the back gauge can be summarised by two questions: does the part require flange dimensions to be identical piece to piece, and does positioning have to come from the program rather than from the operator.
- Automotive: brackets, panels and structural components requiring tight repeatability across high-volume runs.
- Cabinet manufacturing: enclosures and cabinet frames where square, consistent flange dimensions affect final assembly fit.
- HVAC duct fabrication: sheet metal ductwork with long straight flanges, benefiting from stable X-axis positioning across wide beam lengths.
- Electrical enclosures: precision boxes and panels where multiple flanges on the same part demand reliable R-axis collision avoidance.
- Elevator manufacturing: cabin panels and structural components requiring consistent large-format bending accuracy.
- Steel furniture: frames and structural pieces where visible seams make dimensional consistency a cosmetic as well as a functional requirement.
- Kitchen equipment: stainless steel fabrication for commercial kitchens, where hygiene-grade finishes demand accurate first-pass bends to avoid rework marks.
- Heavy machinery: thick-gauge structural components where beam rigidity and servo torque under load are critical to holding tolerance.
11. Frequently asked questions about the back gauge
These questions suit item-by-item confirmation during a machine demonstration or an acceptance conversation.
- How often should a back gauge be calibrated?
As a general baseline, verify daily with a quick reference-part check, perform a full measured calibration monthly and schedule a comprehensive calibration including parallelism and backlash every six months. Increase the frequency after any collision or for tolerance-critical work.
- How accurate is a CNC back gauge?
Most industrial CNC back gauges achieve positioning accuracy in the ±0.02 mm to ±0.05 mm range, with repeatability often tighter. Actual performance depends on beam length, ball screw grade and maintenance condition.
- What causes positioning errors?
Common causes include ball screw backlash, worn linear guides, encoder faults, thermal expansion during long runs, loose or worn stop fingers, and debris on the beam or guide rails.
- What is the difference between the X and R axes?
The X axis controls front-to-back beam travel, setting flange length. The R axis controls the vertical height of the stop fingers, letting them drop clear of previously formed flanges during multi-bend sequences.
- Which back gauge is best for box bending?
Box and pan parts with multiple flanges typically need at least an R axis for collision avoidance, and often benefit from Z1/Z2 independent finger positioning to handle varying flange widths without manual adjustment.
- How many axes do I need?
Simple straight-flange parts need only X and R. General fabrication with mixed geometries benefits from X, R and Z. Tapered, asymmetric or aerospace-grade parts typically need a full 6-axis configuration of X1/X2, R1/R2 and Z1/Z2.
- What is the difference between NC and CNC back gauges?
An NC back gauge offers motorized, digitally displayed positioning but limited program automation between steps, while a CNC back gauge is fully integrated with the machine controller to store and execute complete multi-bend programs automatically.
- Can a manual back gauge be upgraded to CNC?
In some cases, yes. Retrofitting a manual gauge with a servo motor, ball screw and CNC controller integration is possible, but feasibility depends on the machine frame and controller compatibility, so a manufacturer or qualified integrator should assess the machine first.
Technical references
Manufacturer references support process explanations; images illustrate selection topics, not an approved GWMT supply specification.